There’s something truly irresistible about the combination of rich dark chocolate, buttery shortbread crust, and gooey salted caramel. It’s like a gourmet Twix bar but elevated and elegant enough to serve at a dinner party. And guess what? You can totally make it in your own kitchen.
This comprehensive guide will walk you through every detail of crafting the perfect salted caramel chocolate tart — from choosing the best ingredients to blind baking tips for tart crust, and even understanding caramel stages so your caramel is smooth and glossy, never gritty.
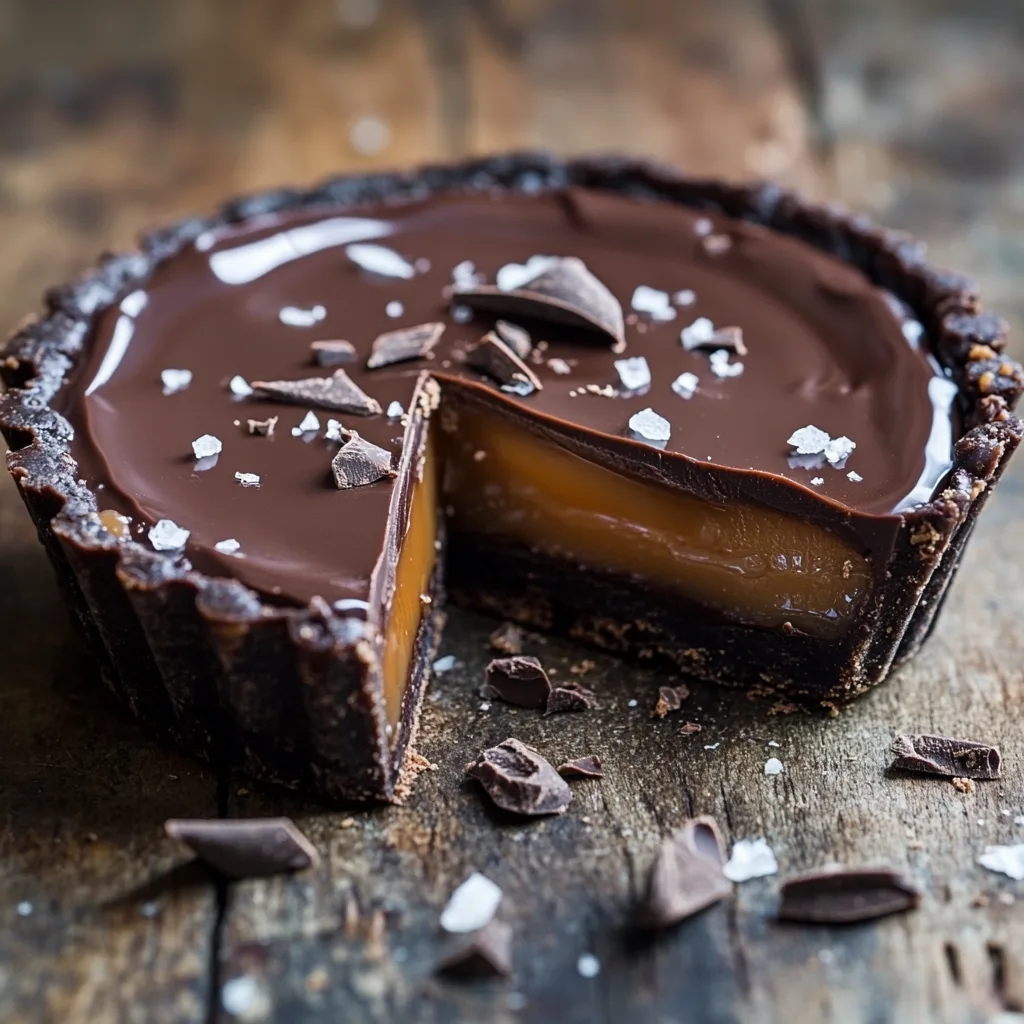
🧁 What Exactly Is a Salted Caramel Chocolate Tart?
Imagine a crisp, buttery tart crust that holds a thick, luscious layer of salted caramel, topped with a shiny chocolate ganache. Each bite offers a contrast of textures and deep, decadent flavors that melt in your mouth. It’s a grown-up version of your favorite candy bar—refined, rich, and seriously impressive.
💡 Why You’ll Love Making This Tart at Home
- It’s a showstopper: The glossy ganache and flaky sea salt garnish look stunning on any dessert table.
- Budget-friendly luxury: Homemade beats the price of bakery versions hands-down.
- Beginner-friendly: Follow step-by-step instructions and you’ll nail it, even if you’re new to baking.
- Make-ahead magic: Perfect for prepping a day before special events.
🧂 Flavor Profile: Why It Works
Let’s break down the taste layers:
- Shortbread crust: Buttery, slightly crumbly, and not overly sweet — the perfect base.
- Salted caramel: Rich and silky with just the right amount of salt to balance the sugar.
- Chocolate ganache: Deep, velvety chocolate with a luxurious mouthfeel.
🥄 Essential Ingredients at a Glance
Here’s what you’ll need for each layer of the tart:
the Shortbread Crust:
- All-purpose flour
- Powdered sugar
- Kosher salt
- Cold unsalted butter
- Egg yolk
- Heavy cream
- Vanilla extract
For the Salted Caramel:
- Granulated sugar
- Light corn syrup (helps prevent crystallization)
- Water
- Heavy cream
- Unsalted butter
- Kosher salt
- Vanilla extract
For the Chocolate Ganache:
- High-quality dark or semi-sweet chocolate (chopped or premium chips)
- Heavy cream
- Corn syrup (for shine)
- Vanilla extract
Optional Garnishes:
- Flaky sea salt (like Maldon or Himalayan pink salt)
- Crushed nuts or cocoa nibs
- Fresh raspberries or edible flowers
🔧 Special Equipment Checklist
- 9-inch tart pan with removable bottom
- Food processor (for the crust)
- Digital thermometer (for caramel accuracy)
- Heavy-bottomed saucepan
- Heatproof mixing bowls
- Whisk & silicone spatula
- Measuring cups and spoons
👨🍳 Mise en Place: Prep for Success
Before diving into each step, make sure your baking station is clean, ingredients are pre-measured, and all your equipment is handy. Caramel waits for no one, so being prepared is key!
✅ Coming up next: We’ll dive into Part 2, where you’ll learn all the essential tools, tips, substitutions, and mistakes to avoid when making your perfect tart. Get ready to bake like a pro!
🛠️ Part 2: Tools, Tips, and Prep for the Perfect Tart
Now that you’re familiar with the layers and ingredients of a salted caramel chocolate tart, let’s dive into what you’ll need to make it happen in your kitchen. Preparation is everything when working with temperature-sensitive components like caramel and ganache.
🔧 Essential Tools for Tart-Making Success
These tools will make your tart-building process smoother and your final result more professional:
- Tart pan with removable bottom: Allows you to lift out the tart easily for clean edges and perfect presentation.
- Food processor: Makes blending the shortbread crust quick and easy.
- Digital thermometer: Crucial for getting the caramel to the “firm ball stage” (245°F) without burning it.
- Heavy-bottomed saucepans: One for caramel, one for heating cream.
- Whisk: For incorporating ingredients smoothly and preventing lumps.
- Silicone spatula: Helps scrape every last drop of ganache and caramel cleanly.
- Measuring cups and spoons: Precision is key, especially for baking.
- Rolling pin & floured surface: To roll out the tart crust evenly.
🥛 Ingredient Swaps and Substitutions
Don’t have everything on hand? Here are a few common substitutions and upgrades:
- Butter: Use unsalted for flavor control. If using salted, reduce the added salt in your recipe.
- Cream: Heavy cream is ideal, but double cream (UK) works great. Avoid milk—it won’t thicken enough.
- Chocolate: Semi-sweet gives a balanced flavor. You can also use:
- Dark chocolate for a more intense bite
- Milk chocolate for a sweeter version
- White chocolate, infused with citrus or raspberry for something unique
- Corn syrup: Optional but helps prevent caramel crystallization. Can be swapped with golden syrup or glucose syrup.
⚠️ Common Mistakes to Avoid
Even seasoned bakers hit bumps—here’s how to dodge the most frequent tart-making mistakes:
- Grainy caramel? You likely stirred too much or didn’t use enough corn syrup. Let sugar dissolve fully and swirl instead of stirring.
- Soggy crust? Always blind bake your tart crust before adding caramel. This prevents sogginess and gives structure.
- Cracking ganache? Chocolate overheated or cooled too quickly. Stir slowly and don’t rush the process.
- Overflowing caramel? Always use a larger pot than you think you need. Caramel foams up a lot when cream is added.
📋 Quick Safety Tips for Handling Caramel
- Use a long-handled whisk and wear an oven mitt while pouring cream into hot sugar.
- Caramel can cause severe burns. Never touch it until fully cooled.
- Have your cream mixture warm before adding to hot sugar. Cold liquid causes explosive bubbling!
⏱️ Prep Like a Pro: Mise en Place
“Mise en place” (French for “everything in its place”) is the single biggest pro move you can make before baking. Before you turn on the stove, be sure to:
- Measure and set aside all ingredients in small bowls.
- Preheat the oven to 375°F (190°C).
- Have all your tools cleaned and ready to go.
- Line your work surface with parchment or a silicone mat for easy cleanup.
💡 Quick Tip: Chill the Crust Before Baking
After pressing the crust into the tart pan, chill it for 20–30 minutes in the fridge. This helps prevent shrinking during baking and keeps your edges neat and tall.
✅ Ready for Part 3? Up next, we’ll walk through each step of assembling your tart — from crafting that golden caramel to smoothing the perfect ganache.
🍫 Part 3: Step-by-Step Tart Creation
Now that you’re prepped and confident with the tools and ingredients, it’s time to dive into the hands-on part. Each layer of this tart plays a delicious role, so take it step by step and trust the process.
🥧 Step 1: Make the Tart Crust
This buttery shortbread-style crust is easy to make and creates the perfect base for rich caramel and chocolate. It holds its shape beautifully and doesn’t overpower the filling.
Ingredients:
- 1 ½ cups all-purpose flour
- ⅓ cup powdered sugar
- ¼ teaspoon kosher salt
- ½ cup cold unsalted butter (cubed)
- 1 large egg yolk
- 2 teaspoons heavy cream
- ½ teaspoon vanilla extract
Instructions:
- Add flour, sugar, and salt to a food processor. Pulse a few times to combine.
- Add the cold butter and pulse until the mixture resembles coarse crumbs.
- Add the egg yolk, cream, and vanilla. Pulse again until the dough forms a ball.
- Wrap the dough in plastic wrap and chill for at least 1 hour.
- On a lightly floured surface, roll the dough into a 12-inch circle, about ⅛-inch thick.
- Press into a 9-inch tart pan with a removable bottom. Trim excess dough.
- Prick the bottom with a fork, freeze for 10 minutes, then line with parchment and weights.
- Bake at 375°F (190°C) for 18–22 minutes until lightly golden.
- Remove weights and cool completely before filling.
Pro Tip: Want to explore another comforting dessert for fall? Try this easy fall dessert too after your tart adventure!
🍯 Step 2: Make the Salted Caramel Filling
This is where the magic begins. A perfect caramel should be smooth, deeply golden, and thick enough to hold its shape once cooled.
Ingredients:
- 1 cup granulated sugar
- 2 tablespoons corn syrup (or golden syrup)
- ¼ cup water
- ½ cup heavy cream (warm)
- 4 tablespoons unsalted butter
- ½ teaspoon kosher salt
- 1 teaspoon vanilla extract
Instructions:
- In a small saucepan, heat cream, butter, and salt over low heat until warm but not boiling. Set aside.
- In a larger saucepan, combine sugar, corn syrup, and water. Stir gently to combine.
- Cook over medium heat without stirring, swirling occasionally, until it turns a deep amber color.
- Carefully pour in the warm cream mixture (it will bubble vigorously!). Whisk constantly.
- Return to heat and cook, whisking, until it reaches 245°F (firm ball stage).
- Remove from heat, stir in vanilla, and let cool for 3–5 minutes.
- Pour into the cooled tart crust. Let set at room temperature for 30–45 minutes.
Want to geek out on sugar science? Check out this excellent breakdown on understanding caramel stages from Serious Eats!
🍫 Step 3: Make the Chocolate Ganache
This silky ganache topping adds the final decadent layer to your tart. Choose a high-quality chocolate bar or premium chips for best results.
Ingredients:
- 6 oz (about 1 cup) chopped dark or semi-sweet chocolate
- ½ cup heavy cream
- 1 tablespoon corn syrup (optional, for shine)
- 1 teaspoon vanilla extract
Instructions:
- Place chopped chocolate and corn syrup in a bowl.
- Heat cream until steaming (don’t boil), then pour over the chocolate.
- Let sit for 5 minutes, then stir until smooth and glossy.
- Stir in vanilla extract.
- Pour over the cooled caramel layer. Use a spatula to smooth to the edges.
- Let set at room temperature for 2–3 hours or refrigerate for 1 hour.
Optional Garnishes: Sprinkle flaky sea salt, crushed cocoa nibs, or gold leaf on top before ganache fully sets.
🍽️ Step 4: Chill and Serve
Cool the finished tart completely before slicing. For clean cuts:
- Use a sharp knife dipped in hot water and wiped dry between slices.
- Serve with espresso, whipped cream, or berries.
Love indulgent desserts with layered flavors? If you love layered desserts, check this one out for more inspiration!
✅ Up Next: In Part 4, we’ll cover FAQs, troubleshooting, creative variations, and how to store or freeze your tart like a pro.
❓ Part 4: FAQs, Troubleshooting, and Variations
You’ve made it through the baking process — congrats! But let’s be honest: even expert bakers encounter a caramel crisis or ganache hiccup now and then. This section covers the most common FAQs, mistakes to avoid, and fun variations to experiment with once you’ve mastered the classic salted caramel chocolate tart.
🛠️ Troubleshooting Guide
Why is my caramel grainy?
This is often caused by stirring the sugar while it cooks or using utensils with sugar crystals on them. Use the “wet method” (adding water to sugar), don’t stir once it starts boiling, and avoid sudden temperature changes.
Why is my tart crust shrinking?
- Make sure the crust is chilled before baking.
- Do not stretch the dough when pressing it into the tart pan.
- Use pie weights and line with parchment to prevent puffing.
is my chocolate ganache hard and dull?
- You may have overheated the chocolate or used too little cream.
- Ganache should be glossy—add corn syrup or a touch of butter for extra shine.
Why does my tart slice unevenly?
- Chill the tart before slicing for clean cuts.
- Use a hot, sharp knife and wipe clean between each slice.
🧠 Pro-Level Tips
- Let each layer cool before adding the next to avoid melting or cracking.
- Use a digital thermometer to get your caramel exactly to 245°F — anything less and it won’t set.
- Add the vanilla extract off heat to preserve its flavor.
Need another cozy dessert for your baking list? Another sweet treat worth trying is our molasses cookies — chewy and perfectly spiced!
📦 How to Store and Freeze the Tart
Storing:
- Refrigerate for up to 4–5 days.
- Wrap loosely in plastic wrap or store in an airtight container.
- Let sit at room temperature for 10–15 minutes before serving for best texture.
Freezing:
- Slice the tart, wrap individual pieces tightly in plastic wrap and foil.
- Store in freezer for up to 1 month.
- Thaw overnight in the fridge before serving.
✨ Creative Variations to Try
Feeling inspired? Try switching things up with these flavor twists and presentation ideas:
Nut Crust Base
- Use ground pecans, almonds, or hazelnuts in place of part of the flour for a deeper, nuttier crust.
Flavor-Infused Caramel
- Add a splash of bourbon, espresso, or maple syrup after caramel has reached 245°F.
Spiced Ganache
- Add a pinch of cinnamon, cayenne, or chili powder to the ganache for warmth and depth.
White Chocolate Ganache
- Use white chocolate with citrus zest or freeze-dried raspberries for a tangy twist.
Mini Tartlets
- Make individual 3-inch tartlets using a muffin tin or mini tart pans — perfect for parties or gifting!
📋 FAQs from Readers and Google Searches
Can I make the tart ahead of time?
Yes! It’s even better when made a day ahead. Let it set overnight in the fridge and bring to room temp before serving.
Can I skip the corn syrup?
You can, but your caramel may crystallize. Use glucose syrup or golden syrup as alternatives if you prefer not to use corn syrup.
What kind of chocolate should I use?
Semi-sweet or bittersweet baking bars are best. Chips work too, but avoid those with stabilizers for better texture.
How do I get clean slices?
Use a hot, dry knife. Wipe it clean between each cut. Chilling the tart before slicing helps too!
Can I make this gluten-free?
Yes — substitute a 1:1 gluten-free flour blend for the crust. Ensure all ingredients (like chocolate and corn syrup) are certified GF.
✅ Final Part Coming Up: In Part 5, we’ll wrap everything up with SEO-rich keywords, internal linking strategy, external resource integration, and final thoughts to publish your post like a pro.
🔗 Part 5: SEO Strategy, Internal Linking & Final Touches
You’ve built a stunning, decadent salted caramel chocolate tart. Now let’s make sure your blog post is optimized to rank, resonate, and get shared.
🔍 LSI & NLP Keywords for SEO
These related keywords can be sprinkled naturally throughout your content to help with search engine visibility. Use them in headings, image alt text, and paragraph content where appropriate:
- chocolate tart recipe
- how to make caramel
- ganache tart
- homemade dessert with caramel
- salted caramel chocolate recipe
- shortbread tart shell
- easy chocolate tart
- gourmet tart ideas
- elegant chocolate dessert
- caramel chocolate ganache
🔗 Internal Linking Strategy
Keep users engaged by linking to relevant posts on your blog. Here’s how we integrated internal links within this article:
- Try this easy fall dessert too – Introduced after the tart crust section to suggest another seasonal bake.
- If you love layered desserts, check this one out – Added after ganache layer for flavor enthusiasts.
- Another sweet treat worth trying – Suggested during the FAQ for further baking adventures.
🌐 External Link Integration
We’ve also included high-authority external resources within the early paragraphs to boost credibility and offer educational value:
- Blind baking tips for tart crust — valuable resource for crust preparation insights.
- Understanding caramel stages — perfect for readers who want to master caramel science.
Note: Make sure these links open in a new tab (target="_blank") and include rel="nofollow noopener" to maintain SEO best practices.
📝 Final Thoughts: Publish Like a Pro
This salted caramel chocolate tart isn’t just a dessert — it’s a statement. From the crisp crust to the luxurious ganache, it delivers gourmet flavor in every bite. And thanks to the make-ahead nature, it’s a perfect choice for holidays, special events, or just treating yourself.
Here’s a quick recap of why this tart is worth your time:
- Three luxurious layers with contrasting textures and flavors
- Perfect for gifting, celebrating, or elevating a cozy night in
- Make-ahead and freezer-friendly
- Adaptable for gluten-free or nut-based variations
Try it once, and you’ll want to make it again — with your own delicious twist.
📸 Share Your Creations!
Did you make this tart? We’d love to see it! Tag your photos on Instagram with #CharlieRecipes or leave a comment below with your tips and flavor swaps. Let’s get baking, one rich slice at a time!
📎 Bonus: Related Recipes You’ll Love
- Cinnamon Apple Cake – a fall favorite
- Crumbl Cookie Copycat Guide
- Bisquick Dumplings – quick comfort food
🎉 And that’s a wrap! You’ve got everything you need to post, promote, and proudly serve your salted caramel chocolate tart recipe. Happy baking!
4 thoughts on “How to Make the Perfect Salted Caramel Chocolate Tart at Home”
Comments are closed.