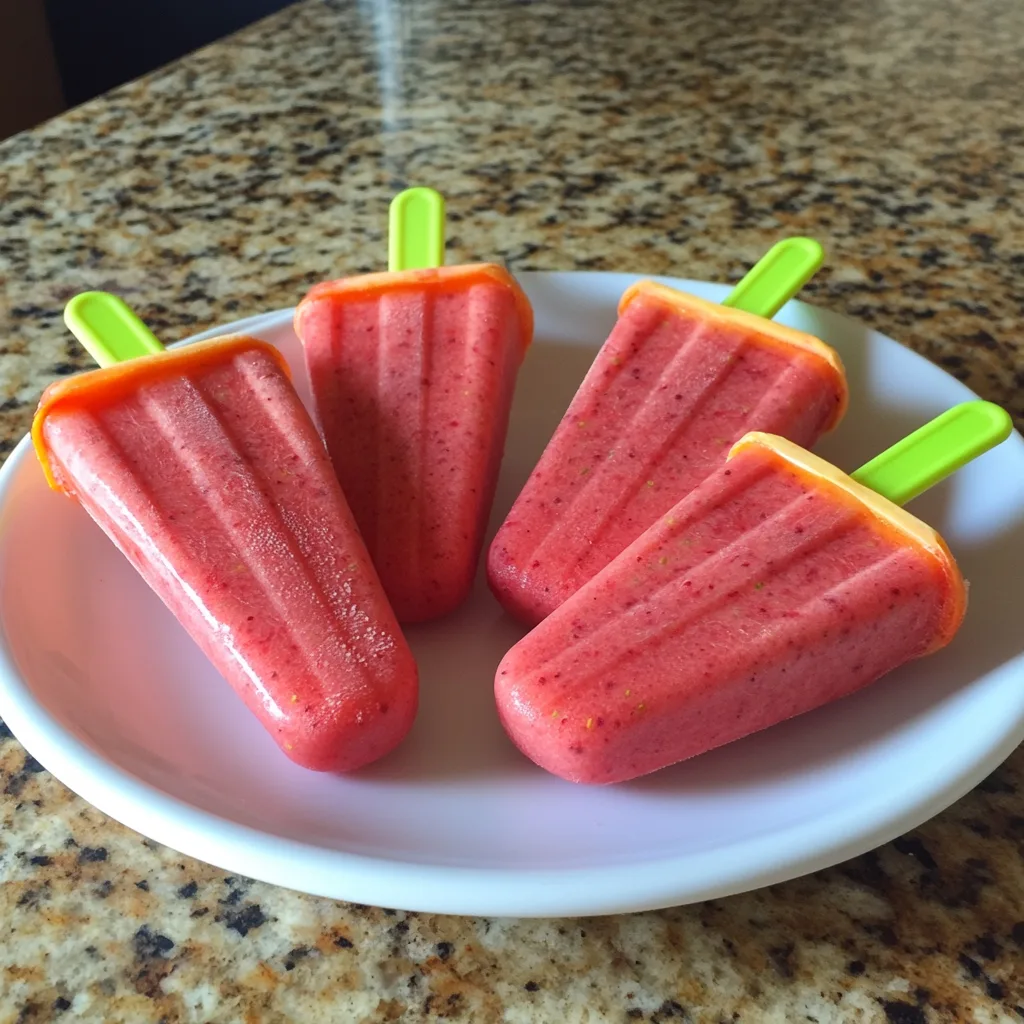
Need a cool, creamy, fruity treat to beat the heat without all the added sugar and mystery ingredients? These Healthy Homemade Strawberry Yogurt Popsicles are your answer. They’re simple to make, packed with real fruit, and take just four easy steps to prepare.
Perfect for kids, ideal for adults, and fully customizable to your taste and dietary needs, this frozen treat is the definition of guilt-free indulgence. We’re talking less sugar, more nutrients, and the kind of snack you can feel good handing to your toddler or sneaking as a late-night dessert.
Strawberries are more than just sweet and juicy — they’re packed with vitamin C, antioxidants, and fiber. According to the nutritional benefits of strawberries outlined by the Academy of Nutrition and Dietetics, these berries support immunity, heart health, and glowing skin — making them a smart base for any healthy snack.
Pair those berries with protein- and probiotic-rich yogurt, and you’ve got a delicious, balanced bite. And unlike sugar-laden store-bought popsicles, this recipe lets you control the sweetness, using natural options like honey or agave. For those watching added sugars, Harvard’s research on sugar in frozen treats breaks down how homemade options like these are often the healthier choice.
—
🍦 What Are Strawberry Yogurt Popsicles?
These popsicles are a blend of real strawberries, creamy yogurt, and a touch of natural sweetener, frozen in molds for a refreshing, nutrient-packed snack or dessert. They’re easy to customize, super fun for kids to help make, and endlessly Instagram-worthy.
- Flavor: Sweet, tangy, and creamy with real fruit bites
- Texture: Smooth and firm with occasional berry chunks
- Nutrition: Protein from yogurt + antioxidants from berries
Whether you’re aiming for a post-workout snack or a summer party crowd-pleaser, these pops check every box.
—
💡 Why Make Homemade Popsicles?
Sure, you can grab a box of pops from the freezer aisle… but homemade gives you:
- Better control: Choose your sweeteners and dairy-free options
- More nutrients: No fillers, just real fruit and real yogurt
- Kid involvement: Let your little ones help layer and pour
- Fun creativity: Add swirls, stripes, chunks, or granola layers!
And let’s be honest — your homemade version tastes fresher, cleaner, and creamier than any store-bought pop could hope to.
—
🥣 The Power Combo: Strawberries + Yogurt
Each ingredient in these pops contributes to both taste and wellness. Let’s break it down:
Strawberries
- Low in calories, high in vitamin C and antioxidants
- Fiber-rich, helping with digestion and satiety
- Delivers natural sweetness and bright color
Yogurt
- Packed with calcium and protein
- Contains probiotics that support gut health
- Greek yogurt offers thicker, creamier texture
When swirled together, they create a cool, creamy, nourishing frozen treat that kids and adults will both adore.
—
🌱 Options for Every Diet
This recipe is flexible. You can make it:
- Vegan: Use coconut or almond yogurt + maple syrup
- Dairy-free: Sub with soy, oat, or cashew yogurt
- Sugar-free: Use no-sugar-added yogurt and blend with very ripe strawberries
- Gluten-free: Naturally gluten-free as written
Even the sweeteners are flexible — from honey and agave to monk fruit or mashed banana.
—
🛠️ Tools You’ll Need
- Popsicle molds (or small cups + sticks)
- Blender or food processor
- Measuring cups and spoons
- Freezer space for setting
- Optional: Fine mesh sieve to strain seeds
Not sure how to get the best freeze and clean release? This popsicle freezing guide from Bon Appétit has you covered with texture tips and layering tricks.
—
🧊 What Are the 4 Simple Steps?
Here’s a sneak peek before we get into the full recipe in Part 2:
- Wash and prep your strawberries
- Blend strawberries with yogurt and sweetener
- Pour into molds and insert sticks
- Freeze until firm, then release and enjoy!
That’s it! No baking, no fancy equipment, and just a handful of wholesome ingredients.
—
Coming up in Part 2: Let’s dive into the full 4-step recipe — with tips, common mistakes to avoid, and a printable guide!
🧁 Healthy Strawberry Yogurt Popsicles: 4-Step Recipe
Let’s make magic with just a blender, some strawberries, creamy yogurt, and a little freezer time. This simple 4-step process will get healthy, delicious popsicles on your table in no time.
—
📝 Ingredients List
- 2 cups fresh or frozen strawberries, hulled
- 1 ½ cups plain or vanilla Greek yogurt (or plant-based yogurt)
- 1–2 tablespoons honey or maple syrup (optional, adjust to taste)
- 1 teaspoon vanilla extract (optional)
- Pinch of sea salt (enhances flavor)
Optional Add-Ins:
- 1 banana (for extra creaminess)
- ½ teaspoon lemon zest (for brightness)
- Chia seeds (fiber boost)
- Swirl in granola or melted dark chocolate before freezing
—
🍓 Step 1: Prep the Strawberries
- Rinse strawberries under cool water
- Remove green tops and halve large berries
- If using frozen strawberries, let them thaw slightly or microwave for 15–30 seconds for easier blending
You can keep it chunky by mashing with a fork, or go smooth with a blender — up to you!
—
🍶 Step 2: Blend with Yogurt and Sweetener
- In a blender, combine strawberries, yogurt, sweetener, vanilla, and salt
- Blend until smooth, or pulse for a chunkier consistency
- Taste and adjust sweetness as needed
If desired, blend half the strawberries and layer the rest for a fun, fruit-forward swirl effect.
—
🧊 Step 3: Pour into Molds
- Carefully spoon or pour the mixture into popsicle molds
- Leave ¼ inch space at the top to allow for expansion
- Insert sticks and gently tap molds to remove air bubbles
No molds? Use paper cups, small mason jars, or even silicone muffin tins! Insert wooden sticks halfway through freezing to keep them centered.
—
❄️ Step 4: Freeze Until Firm
- Place molds upright in the freezer for 4–6 hours, or overnight
- To release pops, run warm water over the outside of the mold for 10–15 seconds
Enjoy right away or store in a freezer bag or airtight container for up to 2 months.
—
💡 Pro Tips for Popsicle Success
- Use ripe strawberries: Sweeter berries = less need for added sugar
- Layer textures: Mix smooth blend with berry chunks or granola
- Taste before freezing: Customize sweetness and salt balance
- For softer pops: Use full-fat yogurt — it’s creamier and freezes better
Want a cheesecake-style version? Add a spoonful of cream cheese and a swirl of strawberry jam before freezing!
—
🚫 Common Mistakes to Avoid
- Over-blending: Results in thin, icy pops instead of creamy ones
- Adding too much sweetener: Popsicles taste sweeter when frozen — taste before adding more
- Not tapping the mold: Air pockets cause uneven freezing and texture
- Forgetting to insert sticks: Set a timer if you’re freezing halfway before adding them
With these tips, your popsicles will come out vibrant, smooth, and scoop-shop-worthy every single time.
—
Next up in Part 3: Discover fun flavor variations, prep and storage tips, and serving suggestions for kids and grown-ups alike!
🍨 Variations, Meal Prep & Serving Ideas
Once you’ve nailed the classic strawberry yogurt combo, there’s a whole world of flavors and textures waiting to be explored! This section helps you take your healthy popsicles to the next level — perfect for kids, adults, and every summer gathering in between.
—
🍓 Fun Flavor Variations
Use the same base process and swap or add ingredients to create endless options:
- Strawberry Banana: Add one ripe banana for extra creaminess
- Strawberry Kiwi: Layer mashed kiwi for a tart contrast
- Strawberry Mango Coconut: Use coconut yogurt and blend in frozen mango chunks
- Cheesecake Swirl: Add a spoonful of cream cheese and swirl in crushed graham crackers
Want to get fancy? Alternate layers for a striped popsicle look — blend separately and pour each flavor slowly for a fun visual effect.
—
👧 Kid-Friendly Shapes & Layers
Getting kids involved in the process makes snack time even more exciting. Try:
- Star, rocket, or animal-shaped molds
- Mixing in rainbow sprinkles or edible glitter
- Letting them swirl in peanut butter or jam
Pro tip: Label flavors and personalize molds so everyone gets their favorite!
—
🧊 Meal Prep & Make-Ahead Tips
Popsicles are perfect for batch prep! Here’s how to get the most from your time in the kitchen:
- Make double or triple batches: These freeze beautifully for up to 2 months
- Wrap each pop individually: Use parchment or reusable silicone sleeves to prevent freezer burn
- Use stackable containers: Save freezer space and keep flavors sealed in
Label your pops with flavor names and freeze dates — it’s fun, and also practical!
—
🥶 How to Store Strawberry Yogurt Popsicles
For Best Results:
- Remove pops from molds once frozen solid
- Wrap in wax paper or parchment
- Place in an airtight container or freezer-safe bag
Don’t forget to date your pops — they’ll keep at peak quality for 6 to 8 weeks. After that, they’re still safe to eat but might lose texture and flavor.
—
🍽️ Creative Ways to Serve Them
These healthy popsicles are tasty on their own, but here are some fun ways to elevate them:
- Brunch bar: Serve alongside yogurt parfaits and mini quiches
- Dessert plate: Dip the tops in dark chocolate and sprinkle with crushed pistachios
- After-school snack: Pair with a homemade granola bar or fruit smoothie
Want more berry-based treat ideas? Try these popular recipes from CharlieRecipes:
- Strawberries & Cream Pastry Puffs – A flaky berry dessert perfect for parties
- Homemade Strawberry Cheesecake Ice Cream – A frozen treat loaded with real fruit and creamy flavor
- Easy Frittata Recipe – Great for a balanced brunch or lunch plate
—
📦 Use Leftovers Creatively
If your pops don’t get eaten right away (unlikely!), here’s how to turn them into new creations:
- Popsicle smoothie: Blend with milk or juice for a fruity refresher
- Frozen yogurt bark: Slice into pieces and mix with granola, then refreeze
- Mini parfaits: Chop and layer with granola and fresh fruit in a cup
Leftovers or not, there’s always a way to enjoy more of this fruity, frozen deliciousness.
—
Next up in Part 4: All your burning questions answered — from best yogurts to freezing time, sugar swaps, and more!
❓ Frequently Asked Questions (FAQs)
Have a popsicle-making question? You’re not alone! Here are some of the most common questions people ask about homemade strawberry yogurt popsicles — with clear, helpful answers to guide your process.
—
🍓 Are strawberry yogurt popsicles healthy?
Yes — especially when you make them yourself! Unlike commercial popsicles that may contain artificial colors and high fructose corn syrup, homemade versions use fresh fruit, yogurt, and optional natural sweeteners.
Yogurt adds calcium, protein, and probiotics. Strawberries bring in vitamin C, fiber, and antioxidants. As long as you control added sugars, they’re a great choice for a healthy snack or dessert.
For more, check out Harvard’s breakdown of the impact of added sugars in frozen treats.
—
🧊 Can I use frozen strawberries?
Absolutely! Frozen strawberries work just as well as fresh ones. Here’s how to use them:
- Let them thaw for 5–10 minutes or microwave briefly to soften
- Drain excess liquid if very watery
- Blend directly for a quick, chilled pop base
Frozen fruit can even help your pops freeze faster and firmer.
—
⏳ How long do popsicles take to freeze?
Most homemade yogurt popsicles take about 4 to 6 hours to fully set in the freezer.
- Freezing overnight is ideal for best results
- If you’re in a hurry, thinner molds freeze faster
Don’t try to rush it — removing them too soon can cause stick slippage or broken pops!
—
🥣 What kind of yogurt works best?
Greek yogurt is a favorite because it’s thick and creamy, creating a rich texture that holds together well when frozen. But you can also use:
- Regular whole milk yogurt for a softer consistency
- Coconut or almond milk yogurt for dairy-free options
- Flavored yogurt for built-in sweetness (just watch added sugar)
Choose full-fat yogurt for the smoothest, creamiest results.
—
💪 Can I use Greek yogurt?
Yes — and you should! Greek yogurt is thicker and higher in protein than regular yogurt, making it perfect for popsicles. It also holds up better in freezing temperatures and gives a luxurious texture.
If using plain Greek yogurt, be sure to add sweetener and vanilla to balance the tang.
—
🧊 Do I need special popsicle molds?
Not at all! While traditional popsicle molds are convenient, you can also use:
- Small paper cups or silicone muffin liners
- Reusable snack pouches
- Ice cube trays for bite-sized pops
Just insert wooden sticks halfway through freezing or use spoons for DIY handles.
—
🍯 Can I make these with no sugar?
Definitely. Here are some sugar-free tips:
- Use very ripe strawberries for natural sweetness
- Skip the honey and rely on fruit and yogurt flavor
- Add banana or dates for a creamy, sweet texture
- Use a zero-calorie sweetener like stevia or monk fruit if preferred
You’re in total control, which is what makes homemade pops the healthiest choice.
—
📦 How long can I store homemade popsicles?
Homemade strawberry yogurt popsicles can be stored in the freezer for up to 2 months. After that, the texture may start to degrade, but they’re still safe to eat.
Tips for storage:
- Unmold and wrap each pop in parchment or wax paper
- Place in freezer-safe zip-top bags or airtight containers
- Label with flavor and date for easy grab-and-go access
—
Coming up in Part 5: We’ll wrap up with garnish ideas, SEO content tips for bloggers, final thoughts, and call-to-action to inspire your readers!
🍓 Final Touches, Blogger Tips & Call to Action
By now, you’ve got all the tools to whip up the easiest, healthiest popsicles of the summer. Whether you’re making them for kids, guests, or just for yourself, these Healthy Homemade Strawberry Yogurt Popsicles deliver creamy, fruity satisfaction in every bite.
—
✅ Quick Recap: The 4 Simple Steps
- Wash and prep your strawberries
- Blend with yogurt and your sweetener of choice
- Pour into molds and insert sticks
- Freeze until solid and enjoy!
Yep — it’s that easy. Now let’s talk about how to elevate your presentation and share your creations with the world.
—
🌿 Garnish & Serve Like a Pro
Want your popsicles to look as good as they taste? Here are some ways to make them pop (pun intended):
- Dip the tips in melted dark chocolate and roll in chopped nuts or coconut
- Serve with fresh mint leaves or edible flowers on the plate
- Dust with freeze-dried strawberry powder for a burst of color and flavor
These simple extras make your pops look gourmet with almost no extra effort.
—
🧠 SEO & Blogging Tips for Recipe Creators
If you’re a food blogger or content creator, this recipe is SEO gold. Here’s how to optimize your post:
- Target long-tail keywords: like “healthy yogurt popsicles,” “strawberry Greek yogurt pops,” and “sugar-free homemade popsicles”
- Use keyword-rich alt text for all images (e.g., “layered strawberry yogurt popsicle in mold”)
- Answer questions in FAQ format for Google rich snippets
- Internally link to complementary recipes like these:
- Strawberries & Cream Pastry Puffs – flaky berry desserts that pair beautifully
- Homemade Strawberry Cheesecake Ice Cream – another fruity frozen treat with a twist
- Easy Frittata Recipe – a great savory balance to your brunch spread
—
🔗 External Links to Include in Your Blog Post
- nutritional benefits of strawberries – EatRight.org
- how to make perfect layered popsicles – Bon Appétit
- impact of added sugars in frozen treats – Harvard T.H. Chan School of Public Health
These high-authority links boost trustworthiness and user experience while avoiding direct recipe competition.
—
📣 Final Thoughts & Call to Action
Homemade popsicles are fun, flavorful, and full of health perks — especially when they’re packed with real fruit and yogurt. These strawberry yogurt popsicles are proof that “treat” and “healthy” can live happily on the same stick.
We’d love to see your creations! If you make this recipe, tag @charlierecipes on Instagram or share your twist using the hashtag #StrawberryYogurtPops.
Craving more clean and simple frozen recipes? Don’t forget to explore our full recipe collection for everything from fruit-packed desserts to fresh and filling mains.
Stay cool, stay creative, and keep snacking smart! 🍓❄️
3 thoughts on “Healthy Homemade Strawberry Yogurt Popsicles in Just 4 Steps”
Comments are closed.