Nothing says comfort like a stack of warm, golden slices of classic French toast. It’s one of the most beloved breakfast staples across the world. Whether you’re cooking for a cozy weekend brunch or just looking for a quick and satisfying weekday treat, this recipe will never let you down.
🍞 What Is Classic French Toast?
Also known by its French name, Pain Perdu—meaning “lost bread”—French toast was originally created to rescue stale bread from the bin. This brilliant concept has stood the test of time, with variations found in nearly every culture. The basic method is simple: soak slices of bread in a sweet egg-and-milk custard, then cook until golden brown. But a perfect French toast takes more than just soaking and frying.
- Key components: Bread, eggs, milk, sugar, vanilla, and cinnamon.
- Technique: Soaking the bread thoroughly, but not to the point of sogginess.
- Cooking: Using medium heat to ensure the interior cooks before the crust burns.
French toast is adored for its custard-like interior and crisp, golden exterior—especially when you use thick-cut breads like brioche or challah.
⭐ What Makes This Recipe Stand Out?
What elevates a regular recipe into a classic French toast recipe is attention to detail. A few pro tips can take your toast from decent to divine:
- Use stale or day-old bread: It absorbs the custard better without falling apart.
- Add a little flour to your batter: This is the secret trick that gives your toast structure and fluffiness.
- Balance the flavors: Don’t skimp on the vanilla and cinnamon. A dash of salt enhances everything.
Choosing the right bread is critical. For an expert’s view, read this guide to the best breads for French toast by Serious Eats. It breaks down why some loaves soak better and hold their shape during cooking.
Want to make sure your toast is golden and not greasy? Then check out how to use a griddle the right way for French toast, pancakes, and more. Mastering your equipment is just as important as perfecting your batter.
📜 A Brief History of French Toast
French toast has roots going back to ancient Rome, where people fried bread in milk and eggs. In medieval Europe, it became a way to make use of every last crumb of bread, a true no-waste dish. French toast eventually made its way to America, where it’s been a breakfast staple ever since.
- 🍽️ Roman Empire: Known as “Pan Dulcis”, sweetened fried bread soaked in milk.
- 📚 Middle Ages: Included in early European cookbooks as “pain perdu.”
- 🇺🇸 Modern day: Served with toppings like maple syrup, powdered sugar, and berries.
Its enduring popularity comes from its affordability, ease, and versatility. Whether sweet or savory, French toast adapts beautifully to any culinary preference.
🧡 Why You’ll Love This Recipe
- ✅ Kid-friendly and adult-approved
- ✅ Perfect for using leftover or stale bread
- ✅ Easy to customize with different milks, breads, or toppings
- ✅ Fast enough for weekdays, special enough for weekends
This guide will walk you through everything from ingredients to technique, and even creative ways to serve and store your homemade French toast. Ready to level up your breakfast game? Let’s get started with the ingredients in Part 2.
🍳 Part 2: Ingredients & Equipment – What You Need to Make Classic French Toast
Every great recipe begins with quality ingredients and the right tools. In this section, we’ll break down exactly what you need to make the best classic French toast, including options for dietary modifications and how to optimize your kitchen setup for perfect results every time.
🥖 Essential Ingredients for French Toast
This recipe uses everyday ingredients that you likely already have on hand. What makes it special is the ratio, the balance, and that one extra step—adding a touch of flour to the batter for added fluffiness.
- Thick-cut bread (12 slices): Brioche, challah, sourdough, or French bread are ideal. Avoid thin or sandwich bread.
- Eggs (3 large): Provide richness and structure. Organic or free-range preferred for better taste.
- Milk (1 cup): Whole milk gives a creamy texture, but you can use oat, almond, or soy milk for dairy-free options.
- All-purpose flour (¼ cup): The secret to thickening the custard-like batter and ensuring a crispy outside.
- Sugar (1 tablespoon): Adds sweetness. Adjust to taste or swap for honey or maple syrup.
- Vanilla extract (1 teaspoon): Adds depth of flavor.
- Ground cinnamon (½ teaspoon): Gives the toast that classic warm, spiced note.
- Salt (a pinch): Balances the sweetness and enhances flavor.
- Butter or oil for cooking: Butter gives the best flavor, but neutral oils work too.
🍞 Best Bread for French Toast
Using the right bread is crucial for the perfect texture. Soft breads like white sandwich bread tend to fall apart when soaked. Instead, go for:
- Brioche: Buttery and soft, a luxurious option.
- Challah: Slightly sweet and eggy, holds its shape well.
- French bread: Dense enough to absorb custard without going soggy.
- Sourdough: Adds a tangy contrast and sturdy texture.
🌱 Ingredient Substitutions for Dietary Needs
If you’re cooking for someone with dietary restrictions, here are some excellent swaps that won’t sacrifice flavor or texture:
- Milk: Use almond, soy, oat, or coconut milk for a dairy-free version.
- Eggs: Replace each egg with 1 tablespoon of chia seeds soaked in 3 tablespoons of water (let sit for 10 min) for a vegan option.
- Sugar: Use maple syrup, coconut sugar, or omit entirely for low-sugar diets.
- Gluten-free bread: Choose a thick-cut, hearty gluten-free loaf for best results.
🔪 Tools & Equipment You’ll Need
To make the cooking process smooth and mess-free, having the right tools is just as important as ingredients. Here’s what to prepare before you start:
- Whisk: For blending your batter to a smooth consistency.
- Mixing bowls: One for the batter, one for soaking slices.
- Measuring cups and spoons: Precision is key for consistent results.
- Non-stick skillet or griddle: A properly heated griddle ensures even cooking.
- Spatula: Preferably wide and flexible for flipping without breaking the toast.
🧰 Optional but Helpful
- Bread knife: If using a fresh loaf, slice thick and evenly.
- Cooling rack: Keeps finished slices crispy while you cook the rest.
- Oven or toaster oven: For warming slices before serving if making a large batch.
📌 Pro Tip
Let your bread sit out overnight to dry slightly. Dry bread soaks up more custard and results in a richer texture. Or, pop fresh slices in the toaster for 1 minute to achieve the same effect.
With all your tools in place and ingredients prepped, you’re now ready to dive into the real fun: making the perfect French toast! Let’s move to Part 3: Step-by-Step Cooking Guide.
🔥 Part 3: Step-by-Step Cooking Guide – How to Make the Best French Toast
Now that you’ve got all your ingredients and tools ready, it’s time to cook up a delicious batch of classic French toast. Follow these step-by-step instructions to ensure each slice turns out golden, fluffy, and full of flavor.
🥣 Step 1: Make the Batter
The foundation of perfect French toast is a well-balanced batter. Here’s how to create a smooth, flavorful custard:
- In a large mixing bowl, whisk together ¼ cup of all-purpose flour and 1 cup of milk. This prevents flour clumps.
- Add 3 eggs and whisk until fully incorporated.
- Stir in 1 tablespoon of sugar, 1 teaspoon vanilla extract, ½ teaspoon ground cinnamon, and a pinch of salt.
💡 Pro Tip: Mix the flour with the milk first to create a smooth base before adding the eggs and flavorings. This makes your batter silky and lump-free.
🍞 Step 2: Prep the Bread
Start with thick-cut bread slices—preferably a bit stale. If using fresh bread, toast it lightly or leave it out uncovered overnight.
- Cut slices to about ¾ to 1 inch thick.
- If the crust is very hard, trim it slightly to allow even soaking.
Great bread options include:
- Brioche: Buttery and soft, perfect for a rich French toast.
- Challah: Eggy and tender, holds up well to soaking.
- French bread: Crusty with a firm crumb, absorbs just enough batter.
🛁 Step 3: Soak the Bread
This is where the magic happens! The goal is to let the bread absorb enough custard to be moist inside, but not fall apart.
- Place one or two slices at a time in the batter.
- Let each side soak for 15–30 seconds, depending on the bread thickness and freshness.
- Gently lift and let the excess batter drip off before cooking.
⚠️ Don’t over-soak! This is one of the most common mistakes and leads to soggy, limp toast.
🔥 Step 4: Cook the French Toast
Time to fire up the griddle or skillet!
- Preheat a non-stick pan or griddle for even heating over medium heat.
- Lightly grease with butter or a neutral oil.
- Cook soaked bread slices for about 2–3 minutes per side, or until golden brown.
- Flip carefully using a wide spatula to avoid tearing.
🥄 Optional: For crispy edges, cook an extra 30 seconds on each side and press slightly with a spatula.
🧪 Step 5: Troubleshooting Common French Toast Mistakes
Even experienced cooks can run into issues. Here’s how to solve them:
- Too soggy? Use drier bread and shorten soaking time.
- Burning? Lower the heat slightly and flip sooner.
- Bland flavor? Increase vanilla, cinnamon, or add orange zest to the batter.
- Eggy taste? Reduce the number of eggs or add more milk to balance.
🍽️ Holding & Serving Tip
If you’re making a big batch for a group, keep cooked slices warm in the oven at 200°F (90°C) on a wire rack placed over a baking sheet. This keeps them crispy and ready to serve.
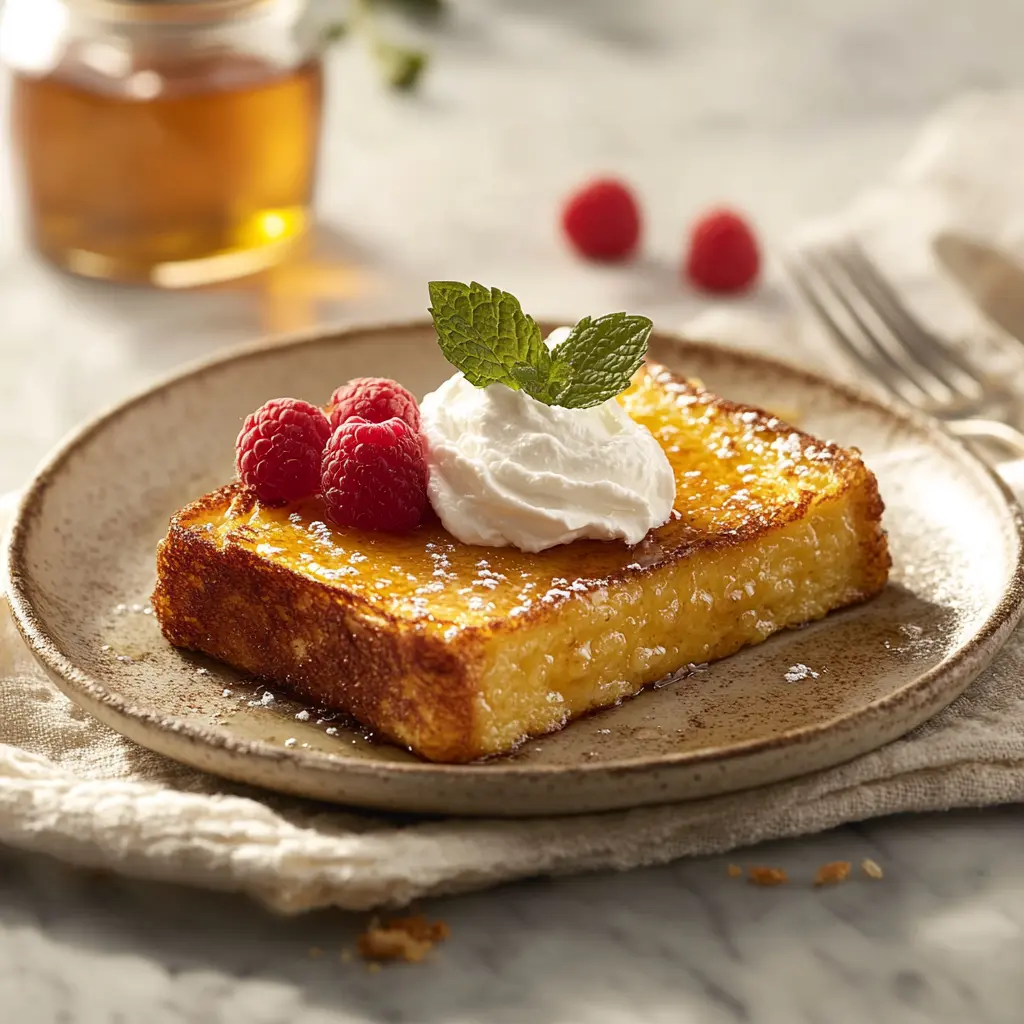
📸 Optional Add-On: Make It Instagram-Worthy
- Cut slices diagonally and stack high on the plate.
- Add fresh berries, powdered sugar, and a drizzle of maple syrup.
- Top with mint leaves or a dollop of whipped cream for extra flair.
You’re now fully equipped to make golden, fluffy, picture-perfect French toast every time. In Part 4, we’ll dive into the best ways to serve, garnish, and enjoy this breakfast classic.
🍓 Part 4: Serving & Pairings – Elevate Your French Toast Experience
Now that you’ve mastered the cooking process, it’s time to talk about presentation, flavors, and accompaniments. The beauty of classic French toast is how customizable it is. From traditional toppings to savory pairings and elegant brunch boards, there’s no shortage of ways to enjoy this timeless breakfast.
🍯 Classic Toppings & Add-ons
These toppings never go out of style and are guaranteed to impress guests or satisfy your own sweet cravings:
- Pure maple syrup: A drizzle brings warm sweetness that complements cinnamon and vanilla perfectly.
- Powdered sugar: Sift lightly over the top for a bakery-style finish.
- Fresh fruit: Strawberries, blueberries, sliced bananas, raspberries, or a seasonal fruit compote.
- Whipped cream: Adds lightness and extra decadence to your plate.
- Nut butters: Peanut butter, almond butter, or Nutella for a richer bite.
- Yogurt: A healthy contrast to the richness—Greek yogurt works well with fruit toppings.
🧂 Savory French Toast Ideas
Don’t limit yourself to sweet! A savory version of French toast makes a great brunch or lunch option. Here’s how to take it in a new direction:
- Top with crispy bacon or sausage for a salty bite.
- Add sliced avocado and poached eggs for a trendy twist.
- Garnish with chives, parsley, or microgreens to finish.
- Stuff it with cheese and ham before frying for a croque monsieur-style delight.
☕ Beverage Pairings
What you sip with your French toast can elevate the experience even further:
- Freshly brewed coffee or espresso: The bitterness balances the sweetness.
- Orange juice or a citrusy mimosa: Refreshing and classic brunch beverages.
- Chai latte or spiced tea: Works especially well if your French toast has cinnamon or nutmeg.
👩🍳 Creative Twists to Try
Once you’ve nailed the classic recipe, it’s fun to experiment with new takes on French toast. Here are some ideas to inspire your creativity:
- Stuffed French toast: Fill two slices with cream cheese and fruit preserves before dipping and frying.
- French toast casserole: Bake multiple layers in a dish with extra custard for a crowd-pleasing option.
- French toast sticks: Slice bread into strips before dipping for a kid-friendly version.
- Caramelized banana topping: Sauté bananas in butter and brown sugar for an indulgent finish.
Looking for a sweet pairing that completes your brunch spread? Try our easy cinnamon apple cake recipe for a warm, spiced dessert that echoes the flavors of your French toast.
🧊 Storage, Reheating & Freezing Tips
French toast is best enjoyed fresh, but leftovers can be easily stored and revived for later enjoyment.
- To store: Let slices cool completely, then store in an airtight container in the refrigerator for up to 3 days.
- To reheat: Toast in a dry pan or oven at 350°F (175°C) for 5–10 minutes until warm and crispy.
- To freeze: Lay cooked slices on a parchment-lined baking sheet, freeze until solid, then transfer to a freezer bag. Store for up to 2 months.
Want to pair your French toast with another breakfast favorite? Check out our fluffy pancake recipe to build a complete brunch menu.
With all these serving ideas in mind, you’re ready to impress at your next breakfast or brunch gathering. In Part 5, we’ll answer the most common French toast questions, share nutrition tips, and wrap it all up with final insights!
🤔 Part 5: FAQs + Final Tips – Everything Else You Need to Know
Still have questions? You’re not alone. These frequently asked questions about classic French toast come straight from what people are searching for online. Let’s clear up the confusion and help you become a true breakfast pro.
❓ What Is the Trick to Making Good French Toast?
The secret lies in three things:
- Good bread: Slightly stale and thick-cut, like challah or brioche.
- Balanced custard: The right mix of eggs, milk, flour, vanilla, and spices.
- Medium heat: Keeps it golden without burning or drying out the center.
❓ What Is the Most Common Mistake in Making French Toast?
Over-soaking the bread. When bread absorbs too much custard, it becomes soggy and breaks apart. Always:
- Use firm or dried-out bread
- Limit soak time to 15–30 seconds per side
❓ Should Bread Be Dry for French Toast?
Yes, absolutely. Dry bread absorbs more batter without turning mushy. That’s why day-old bread is ideal. You can also toast bread lightly or leave slices out for an hour to dry them before cooking.
❓ Can I Make French Toast Without Eggs?
Yes! While traditional recipes use eggs, there are several alternatives:
- Chia or flax eggs (1 tbsp seeds + 3 tbsp water)
- Mashed bananas or applesauce (¼ cup per egg)
- Commercial egg replacers like JUST Egg
These swaps work well if you’re vegan or have allergies—just expect a slightly different texture.
❓ Why Does My French Toast Taste Eggy?
This usually means the custard has too many eggs or wasn’t mixed thoroughly. To fix it:
- Use 1 egg per ½ cup of milk as a ratio
- Add vanilla and cinnamon to mask strong egg flavors
- Include a bit of flour to thicken and balance the batter
❓ Can I Make French Toast Ahead of Time?
Yes, and it’s a great option for busy mornings or brunch events:
- Cooked in advance: Refrigerate or freeze, then reheat as described in Part 4.
- Overnight bake: Layer bread in a dish with custard and refrigerate overnight. Bake in the morning for a French toast casserole.
🥗 Nutritional Information & Health Tips
French toast can be indulgent, but it’s easy to make it healthier with a few tweaks:
- Use whole grain or protein bread to boost fiber and satiety.
- Switch to plant-based milk like almond or oat for fewer calories.
- Skip the syrup and top with fresh fruit for natural sweetness.
- Cook with minimal oil or use a non-stick spray instead of butter.
Want to know exactly how many calories and macros are in each slice? Use the USDA Nutritional Database to check values for each ingredient based on your custom version.
💬 Final Thoughts & Bonus Tips
- Don’t rush the process: A couple of extra minutes soaking and cooking each slice makes a big difference.
- Mix your batter in a shallow dish: Makes dipping and coating each slice easier.
- Use a wire rack after cooking: Keeps slices crisp while you prepare more.
- Try a themed brunch: Pair with our step-by-step French toast guide and your favorite side dishes for a gourmet vibe.
🎉 Conclusion
This classic French toast recipe isn’t just about food—it’s about comfort, creativity, and confidence in the kitchen. With the tips, techniques, and variations in this guide, you’re now equipped to cook breakfast like a pro.
Whether you’re making it for a lazy Sunday brunch or prepping ahead for the week, this recipe is sure to become a go-to favorite. So heat up the skillet, grab your bread, and create a plate full of golden, fluffy joy.
2 thoughts on “Classic French Toast Recipe: Easy, Delicious, and Perfect Every Time”
Comments are closed.